How to Blind Bake Pie Crust for Flaky, Crisp Results Every Time
Achieving a perfectly flaky, crisp pie crust with a golden hue and not a hint of sogginess can feel like the holy grail of baking. For many home bakers, the fear of a dreaded "soggy bottom" or a shrunken, tough crust has led to avoiding the crucial step of blind baking. Yet, mastering how to parbake and blind bake pie crust is the ultimate secret to foolproof, flaky pie dough. It’s a technique that, once understood, transforms your pie-making from a guessing game into a consistent success story.
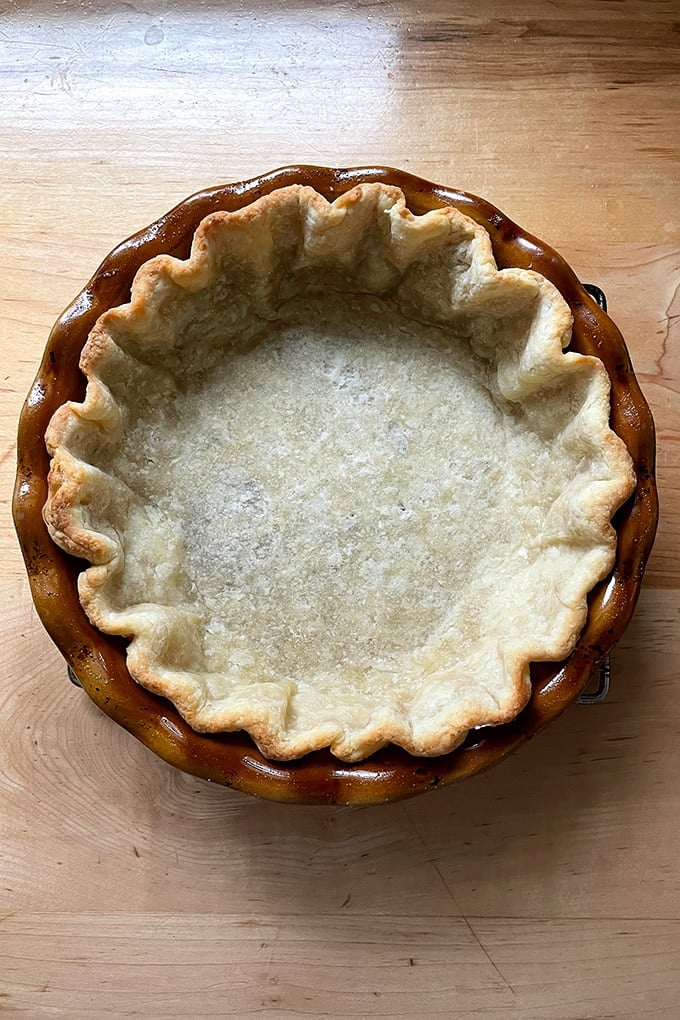
For years, I, like many, viewed blind baking as an unnecessary chore – an extra step involving weights, chilling, and the potential for an overbaked crust. My initial attempts often resulted in frustration, leading me to question its true value. However, a significant shift in my approach, focusing on specific details, revealed the transformative power of a properly blind-baked crust. The result? Edges that were lightly toasted, a bottom that was mostly blonde but thoroughly cooked, and a finished pie crust that was deeply caramelized, offering a delightful texture without being overdone. This revelation turned blind baking from an avoided task into an essential, non-negotiable part of my pie-making process.
What is Blind Baking and Why is it Essential for Perfect Pies?
Blind baking, also known as par-baking or pre-baking, is the process of partially or fully baking a pie crust before you add its filling. This seemingly extra step is the single most effective way to combat the dreaded soggy bottom, ensuring your pie base is just as delicious and texturally satisfying as the filling it holds. This technique is particularly vital for pies with wet fillings that release a lot of moisture during baking (think quiches, pumpkin pies, or fruit pies with juicy berries) or for pies with no-bake fillings (like puddings, custards, or fresh fruit tarts) where the crust won't undergo further baking.
When a raw pie crust meets a wet filling, the moisture can seep into the dough, causing it to steam rather than crisp, resulting in a gummy, undercooked texture. Blind baking creates a protective barrier, essentially "setting" the crust so it can better withstand the moisture from the filling.
The Science Behind a Flaky Crust
At its heart, pie dough is a delicate balance of flour, fat, water, and salt. The key to flakiness lies in the fat, which, when properly incorporated, creates tiny pockets within the dough. As the pie bakes, the water in the dough turns to steam, pushing apart these layers of fat and flour, creating those coveted flaky layers. However, this process can be hindered if the dough is too warm, the gluten is too developed, or if external moisture interferes. Blind baking helps control these variables, allowing the crust to achieve its full textural potential before the filling even enters the picture.
Partially Baked vs. Fully Baked: Know Your Needs
Understanding the difference between partially and fully blind baking is crucial for selecting the right approach for your recipe:
*
Partially Baked: The crust is baked until the edges are golden and the bottom is set but still pale. This is ideal for pies that will undergo significant additional baking with their filling, such as fruit pies, pumpkin pies, or quiches. The goal here is to give the crust a head start, preventing it from becoming soggy without overcooking it once the filling is added.
*
Fully Baked: The crust is baked until it's deeply golden brown and fully crisp, ready to be filled with a no-bake filling like a chocolate cream, lemon meringue, or fresh fruit tart. In these cases, the crust will not see the inside of an oven again once the filling is in, so it needs to be perfectly cooked and golden beforehand.
The Foundational Steps for Foolproof Pie Dough Success
While the act of blind baking involves specific oven steps, the groundwork for a truly foolproof, flaky pie crust begins much earlier, in the preparation of your dough. Two factors stand paramount in preventing shrinkage and ensuring a stable, beautifully textured base. For a deeper dive into these critical preparatory steps, check out our guide on
Foolproof Parbaking: Chilling & Weights for Perfect Crust.
The Power of Proper Chilling
Chilling your pie dough is not merely a suggestion; it’s a non-negotiable step that underpins the success of your crust. After mixing your pie dough, it needs to rest in the refrigerator for at least 30 minutes, though 12 to 24 hours is even better. This extended chill serves two vital purposes:
1.
Easier Rolling: Chilling allows the natural protein strands, or gluten, that form when flour is hydrated, to relax and soften. A relaxed dough is far more pliable and easier to roll out without tearing or snapping back, ensuring you can achieve an even thickness.
2.
Reduced Shrinkage: This relaxation of gluten also prevents the dough from shrinking dramatically in the oven. If the gluten is still tense from mixing, it will contract when exposed to heat, pulling your beautifully crimped edges down the sides of the pie plate.
Beyond chilling the dough after mixing and before rolling, another short chill *after* fitting the dough into the pie plate and crimping the edges can further solidify the fat and relax the gluten, acting as a double safeguard against shrinkage.
Don't Skimp on Pie Weights
When it comes to preventing your pie crust from puffing up or shrinking during blind baking, pie weights are your best friend. But there's a trick: you need far more than you might think. When you line your chilled pie shell with parchment paper and fill it with weights (whether ceramic pie weights, dried rice, beans, or even sugar, all of which can be saved and reused), be sure to fill it to the very top. I often pile them high, even above the rim of the dough, ensuring even pressure across the entire surface. For a standard 9-inch pie shell, this can easily mean 3 to 3.5 pounds of dried rice or beans. This substantial weight creates an even resistance against the crust, preventing the sides from slumping and the bottom from bubbling up, which is critical for a smooth, flat base.
Your Step-by-Step Guide to Blind Baking Pie Crust
Now that you understand the "why," let's dive into the "how" to achieve a perfectly blind-baked crust every time.
1. Prepare Your Dough and Plate
Start with your chilled round of pie dough (homemade or store-bought, though homemade offers superior flavor and texture). On a lightly floured surface, roll it out into a round approximately 12-13 inches in diameter for a 9-inch pie plate. Gently transfer the dough to your pie plate – folding it in quarters often makes this easier – and carefully unfold and press it into the bottom and sides without stretching. Trim any overhanging dough, leaving about a 1/2-inch border, then crimp the edges creatively or simply tuck them under to form a sturdy rim. For the flakiest pies, avoid overhandling the dough at this stage.
2. Chill for Stability
Once your dough is fitted and crimped, place the pie plate in the refrigerator for at least 30 minutes, or even better, 1-2 hours. This second chill is crucial for firming up the butter and relaxing the gluten one last time, significantly reducing the chance of shrinkage during baking. Many experienced bakers even advocate for a 20-minute stint in the freezer for ultimate stability, especially on warm days.
3. Line, Fill, and Bake (First Stage)
Preheat your oven to a relatively high temperature, typically between 375°F (190°C) and 400°F (200°C). Place your chilled pie plate on a baking sheet – this makes it easier to transfer and catches any potential spills.
*
Prick the Bottom: Lightly prick the bottom of the pie crust with a fork several times. This creates tiny vents for steam to escape, further preventing bubbles.
*
Line with Parchment: Gently line the inside of the pie crust with a piece of parchment paper or aluminum foil, ensuring it covers the bottom and extends up the sides, creating a sling. Crinkling the parchment first helps it conform better to the shape of the crust.
*
Add Weights: Fill the parchment-lined crust completely with your chosen pie weights (dried beans, rice, or ceramic weights). Remember, fill it high, right up to and slightly over the crimped edge, distributing them evenly.
*
First Bake: Bake for 15-20 minutes, or until the edges of the crust are lightly golden and set. The bottom will still be pale, protected by the weights.
4. The Second Bake (Weight Removal)
Carefully remove the pie plate from the oven. Using the parchment paper as a sling, lift out the pie weights and parchment. Be gentle, as the crust is still somewhat fragile.
*
Continue Baking: Return the crust to the oven for another 10-15 minutes. This allows the bottom of the crust, now exposed, to dry out and begin to brown. Keep a close eye on it during this stage, as it can brown quickly.
5. Achieving Golden Perfection (Optional Fully Baked Stage)
If your recipe calls for a *fully* blind-baked crust (for no-bake fillings), continue baking for an additional 5-10 minutes after the second bake, or until the entire crust, including the bottom, is deeply golden brown and looks completely cooked. If you notice any areas browning too quickly, you can loosely tent them with aluminum foil.
Once baked, remove the pie crust from the oven and let it cool completely on a wire rack before adding your filling. This allows any residual moisture to evaporate and ensures the crust maintains its crispness.
Troubleshooting Common Blind Baking Woes
Even with the best intentions, issues can arise. Here are quick fixes for common problems:
*
Shrinkage: Almost always due to insufficient chilling or stretching the dough when fitting it into the plate. Ensure adequate chilling at every stage.
*
Puffy Bottom: Not enough pie weights, or uneven distribution. Fill those weights high and evenly!
*
Cracks: Can happen if the dough is too dry, handled roughly, or removed from the plate too soon after baking. A little crack can often be patched with a bit of raw dough or egg wash.
*
Over-browning Edges: If your edges are browning too quickly, gently crimp a ring of aluminum foil around the crust perimeter for the remainder of the baking time.
Ultimately, mastering this technique is your secret weapon to
End Soggy Bottoms: Your Guide to Flaky Pie Crusts.
Blind baking might seem like an extra step, but its impact on the quality of your finished pie is undeniable. By understanding the importance of chilling, using sufficient weights, and following a clear step-by-step process, you can confidently how to parbake and blind bake pie crust, resulting in a truly foolproof, flaky pie dough every single time. Say goodbye to soggy bottoms and hello to perfectly crisp, golden crusts that elevate every pie you bake. Happy baking!