End Soggy Bottoms: Your Guide to Flaky Pie Crusts
There's a universal dread among bakers: the dreaded soggy bottom. You've painstakingly crafted a beautiful pie, filled it with a delicious creation, only to cut into it and find a damp, unappetizing crust lurking beneath. It's a culinary heartbreak, but one that's entirely preventable. The secret to achieving that coveted, crisp, and beautifully golden crust – even with the wettest of fillings – lies in a technique known as blind baking, or parbaking. This comprehensive guide will equip you with the knowledge and how to blind bake pie crust for flaky, crisp results, ensuring your pies are perfection from top to bottom.
For too long, many home bakers, including myself, viewed blind baking as an extra, intimidating step. The hassle of pie weights, the chilling times, the fear of an overbaked crust – it all seemed like more trouble than it was worth. But a truly foolproof flaky pie dough requires this crucial preparation. Once you master the nuances of foolproof parbaking: chilling & weights for perfect crust, you'll wonder how you ever baked without it. It's not about adding complexity; it's about paying attention to details that elevate your pie game significantly.
Understanding the "Why": The Science Behind Flaky Crusts and Soggy Bottoms
Before diving into the "how," let's demystify the "why." What exactly is blind baking, and why is it so vital for preventing soggy bottoms and achieving that desirable flaky texture?
- What is Blind Baking? Also known as parbaking or pre-baking, blind baking refers to the process of partially or fully baking a pie crust before adding its filling.
- Parbaking (Partial Baking): This means baking the crust until it's set and lightly golden, but not fully cooked through. It's ideal for pies with fillings that require a longer bake time themselves, like quiches, pumpkin pies, or fruit pies with a substantial liquid content. The goal is to give the crust a head start, creating a moisture barrier without overcooking it once the filling is added.
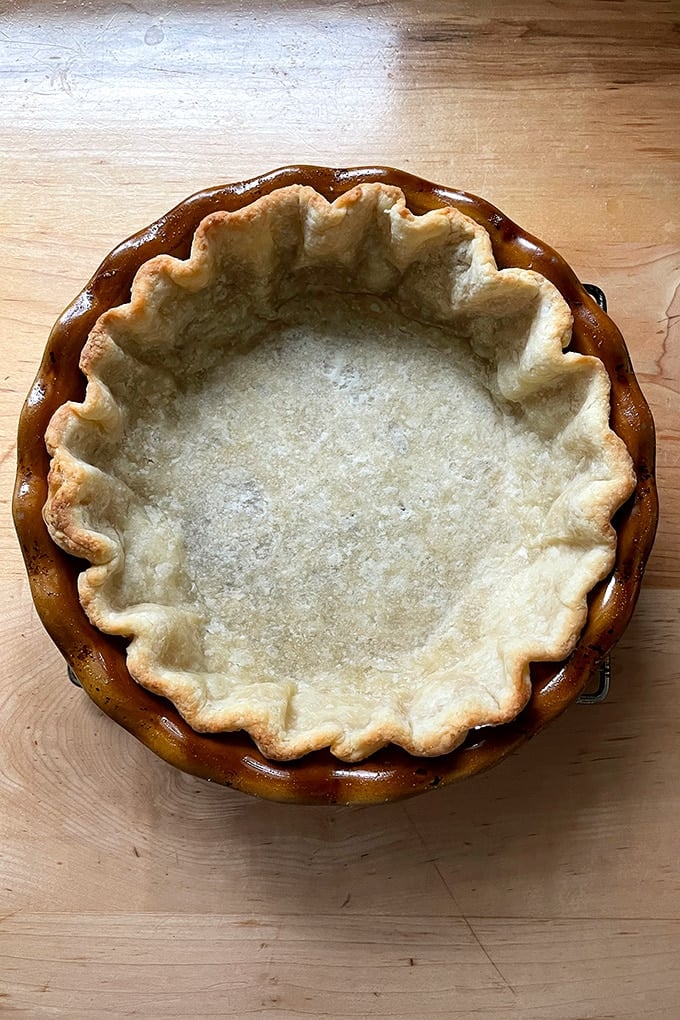
- Full Blind Baking: This involves baking the crust until it's completely golden brown and cooked through. This method is essential for pies with no-bake fillings, such as pudding pies, fresh fruit tarts, or any recipe where the filling doesn't go into the oven at all, or only for a very short time.
The core principle is simple: moisture. A raw pie crust is like a sponge. When a wet filling is poured into it and baked, the crust absorbs the liquid, turning gummy and soft. Blind baking addresses this by:
- Creating a Moisture Barrier: By pre-cooking the crust, you effectively seal its surface, making it less susceptible to absorbing moisture from the filling.
- Driving Out Moisture: The heat of the oven evaporates much of the inherent moisture in the dough, resulting in a crispier texture.
- Setting the Structure: Pre-baking helps the crust retain its shape and prevents it from collapsing or shrinking excessively during the final bake, contributing to a more stable and flaky outcome.
The Pillars of Perfection: Chilling and Pie Weights
Achieving a truly flaky, well-structured pie crust that resists shrinkage and sogginess boils down to mastering two critical details: sufficient chilling and the proper use of pie weights.
The Importance of Chilling Your Pie Dough
Chilling isn't just a suggestion; it's a non-negotiable step for a foolproof flaky pie dough. There are two crucial chilling periods:
- After Mixing, Before Rolling: Once your pie dough is mixed, it needs to rest in the refrigerator for at least 30 minutes, but ideally 12 to 24 hours. Why so long?
- Relaxes Gluten: When flour is hydrated and worked, gluten proteins form elastic strands. Chilling allows these strands to soften and relax. A relaxed dough is much easier to roll out evenly without snapping back, and it's less prone to shrinking dramatically in the oven.
- Firms the Fats: The butter or shortening in your dough needs to be very cold and firm. Chilling ensures this, which is crucial for creating those distinct layers that make a crust flaky. Warm fat melts too quickly, leading to a tough, dense crust.
- After Forming in the Pie Plate, Before Baking: Once you've rolled out your chilled dough and fitted it into the pie plate, a second chill is highly beneficial. Place the pie plate, with the unbaked crust, back into the refrigerator for at least 30 minutes. This final chill before baking helps the butter firm up one last time, setting the crust's shape and further guarding against shrinkage during its initial blast in the hot oven.
You Need More Pie Weights Than You Think
Pie weights are your best friend in the battle against shrinkage and puffing. They exert even pressure on the dough, keeping it from bubbling up in the center and sliding down the sides. But the key is using enough of them.
- Fill to the Brim (and Beyond): Don't just scatter a few weights on the bottom. You need to fill the parchment-lined pie shell completely to the very top edge, even mounding them slightly higher than the rim of the dough. This ensures that the weights press against the sides of the crust, preventing them from slumping during baking. For a standard 9-inch pie plate, you'll typically need around 3-4 pounds of weights (whether ceramic beads, dried beans, or uncooked rice).
- Types of Weights:
- Ceramic Pie Weights: These are reusable, designed specifically for this purpose, and conduct heat well.
- Dried Beans or Uncooked Rice: These are excellent, affordable alternatives. Just remember that once they've been used for baking, they're not suitable for cooking and should be reserved solely for future blind baking projects.
- Sugar: Some bakers even use granulated sugar as a weight. It provides excellent contact, but it caramelizes, so it might not be suitable for all crusts.
Your Step-by-Step Guide to Foolproof Blind Baking
Ready to embark on your journey to a perfectly crisp crust? Follow these steps closely to how to parbake and blind bake pie crust foolproof flaky pie dough.
- Prepare Your Dough and Plate:
- Remove your chilled pie dough round from the fridge. On a lightly floured surface, roll it out into a roughly 15-inch round, ensuring an even thickness.
- Carefully transfer the dough to your 9-inch pie plate. A common method is to fold the dough in half, then in half again, and center the folded quarter-circle in the pie plate before unfolding.
- Gently ease the dough into the contours of the plate, being careful not to stretch it, as stretching will encourage shrinkage.
- Trim the overhanging dough, leaving about a 1/2-inch border extending beyond the edge of the pie plate. Tuck this excess dough underneath itself, creating a slightly thicker edge, then crimp as desired.
- Using a fork, lightly prick the bottom of the pie crust all over. This creates small vents for steam to escape, further preventing large bubbles.
- Chill Again: Place the prepared pie crust back into the refrigerator or freezer for at least 30 minutes to firm up the butter and set the shape. This is a critical step for preventing shrinkage.
- Preheat and Prepare for Baking:
- Preheat your oven to 400-425°F (200-220°C). The exact temperature can vary slightly by recipe, but a higher initial temperature helps set the crust quickly.
- Line the chilled pie crust with parchment paper. Ensure it covers the bottom and goes up the sides. You can also use aluminum foil, crimping it tightly around the edges for extra support.
- Fill the lined crust generously with your pie weights (ceramic beads, dried beans, or rice) – remember, fill it to the very top, even mounding slightly. This pressure is key to preventing the sides from slumping and the bottom from puffing.
- The First Bake (with weights):
- Carefully place the pie plate onto a baking sheet (this makes it easier to transfer and catches any potential spills).
- Bake in the preheated oven for 15-20 minutes. You're looking for the edges to be lightly golden and the dough to appear set.
- If the edges start browning too quickly, you can create a foil shield to protect them.
- The Second Bake (without weights):
- Remove the pie from the oven. Carefully lift out the parchment paper and pie weights.
- Return the pie crust to the oven for another 10-15 minutes, or until the bottom is golden brown and appears dry.
- For a *parbaked* crust (for wet fillings), bake until it's a light golden blonde.
- For a *fully blind-baked* crust (for no-bake fillings), continue baking until it's deep golden brown and completely crisp.
- Keep a close eye on it during this stage, as crusts can brown quickly.
- Cool Completely:
- Once baked to your desired doneness, remove the crust from the oven and let it cool completely on a wire rack before adding any filling. Filling a warm crust can still lead to a soggy bottom!
Troubleshooting and Expert Tips for the Flakiest Results
- Preventing Overbaking: If your edges are browning too fast, loosely tent them with aluminum foil during the initial bake.
- Patching Cracks: Should your crust develop a crack after baking, a small amount of egg white brushed over it can seal it when baked again for a minute or two.
- Even Browning: Rotate your pie crust halfway through each baking stage to promote even browning.
- Don't Stretch the Dough: When fitting the dough into the plate, lift and ease it in rather than stretching. Stretching causes the gluten to tense up and will inevitably lead to shrinkage.
- Use a Metal Pie Plate: Metal conducts heat more efficiently than glass or ceramic, resulting in a crispier bottom crust.
Blind baking might seem like an extra step, but it's a small investment of time that yields immense returns in the quality of your finished pies. No longer will you dread the cut, fearing what lies beneath. Instead, you'll confidently present pies with a perfectly golden, undeniably flaky crust that complements your delicious fillings. Embrace the chill, pile on the weights, and banish soggy bottoms from your baking repertoire forever.
