Foolproof Parbaking: Chilling & Weights for Perfect Crust
For many home bakers, the quest for the perfect pie often ends in disappointment: a beautiful golden top crust hiding a sadly soggy bottom. Or perhaps a delicious filling, only to be undermined by a shrunken, misshapen shell. These common woes can be incredibly frustrating, but they don't have to be your pie-making destiny. The secret to achieving a consistently crisp, flaky, and perfectly shaped pie crust lies in a technique known as parbaking, or blind baking. This comprehensive guide will show you
how to parbake and blind bake pie crust foolproof flaky pie dough, transforming your pies from good to absolutely legendary.
The Art of the Flaky Crust: Why Parbaking Matters
For years, many of us, including seasoned bakers, might have shied away from parbaking, viewing it as an extra, time-consuming step. The fear of an overbaked crust or simply adding complexity to an already intricate process was a deterrent. However, once mastered, the technique proves to be an indispensable ally in the pursuit of pie perfection.
What exactly is parbaking (or blind baking)? It's the process of partially or fully baking your pie crust *before* adding the filling. This crucial step creates a protective barrier, preventing the moisture from wet fillings (like pumpkin, quiche, or fruit pies) from seeping into the raw dough and turning it into an unappetizing, gummy mess. For pies with no-bake fillings, such as puddings or fresh fruit tarts, a fully blind-baked crust provides a ready-to-fill, crisp foundation that ensures every bite is a delightful contrast of textures.
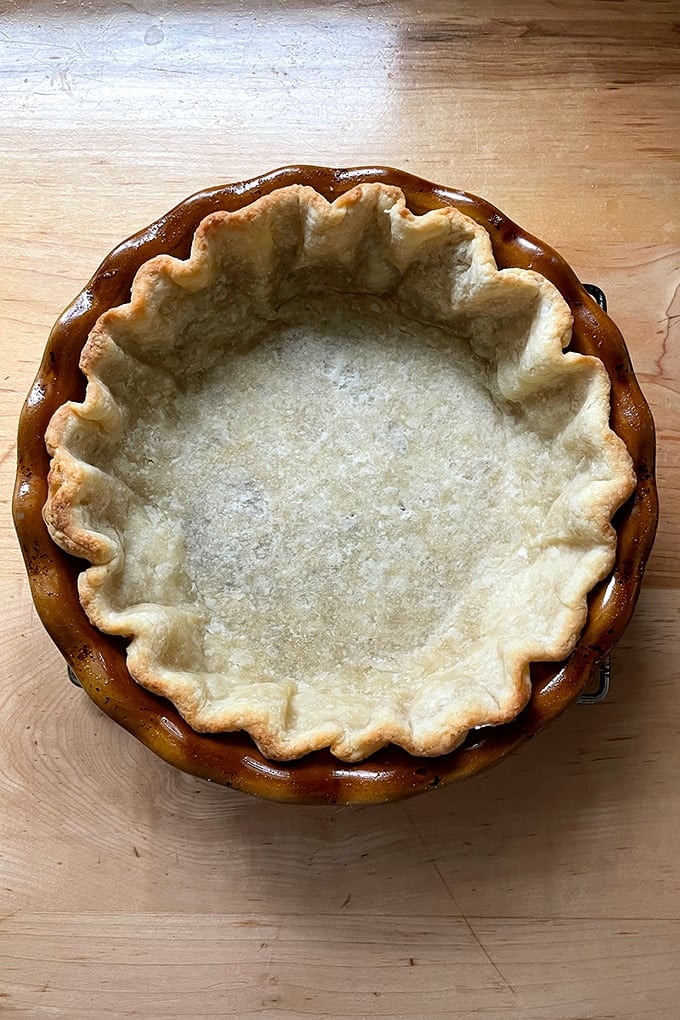
The difference in the final product is striking. A properly parbaked crust emerges from the oven with a bottom that's blonde but set, and edges that are lightly toasted. Once filled and baked again, that initial blonde surface deepens to a rich caramelization, contributing incredible flavor without ever tasting overcooked. If you're tired of soggy bottoms, delving into this technique is your solution. For more insights on this very topic, you might find our article
End Soggy Bottoms: Your Guide to Flaky Pie Crusts incredibly helpful.
Mastering the Chill: The Secret to No-Shrink Dough
The journey to a perfect parbaked crust begins long before the oven even turns on. One of the most critical, yet often underestimated, steps is chilling your pie dough. This isn't just a suggestion; it's a non-negotiable requirement for a truly foolproof result.
Why is chilling so important? It comes down to two primary scientific principles:
1.
Gluten Relaxation: When flour is hydrated and mixed, natural protein strands called gluten begin to form. These strands develop elasticity, which is great for bread, but in pie crust, they can lead to significant shrinkage in the oven. Chilling the dough, especially for an extended period (ideally 12-24 hours, but at least 30 minutes), allows these gluten strands to relax. A relaxed dough is much easier to roll out and, crucially, will hold its shape beautifully without shrinking when exposed to heat.
2.
Fat Solidity: Pie dough relies on cold butter or shortening to create those coveted flaky layers. As the dough bakes, the solid pieces of fat melt, releasing steam that pushes apart the layers of flour. If your dough isn't sufficiently chilled, the fat will melt prematurely before it has a chance to create that steam, resulting in a tough, greasy, or crumbly crust rather than a light and flaky one.
Therefore, whether you're making your own dough from scratch or using a store-bought version, always ensure it spends ample time in the refrigerator. A well-rested dough is a cooperative dough, setting the stage for success.
The Weight of Success: How to Use Pie Weights Effectively
Once your dough is perfectly chilled and rolled, the next vital component for a flawless parbake is the strategic use of pie weights. Many bakers underestimate the sheer quantity needed, leading to frustrated sighs as their crusts puff up, slump, or bubble in the oven.
The purpose of pie weights is simple: to provide enough even pressure to prevent the pie crust from shrinking, bubbling, or slumping down the sides of the pie plate as it bakes. You have several options for pie weights:
- Ceramic Pie Weights: These are specifically designed for blind baking and are reusable.
- Dried Beans or Rice: A cost-effective and readily available alternative. Like ceramic weights, they can be stored and reused for blind baking (though typically not for eating after baking).
- Granulated Sugar: Some bakers even use sugar, which can create a wonderfully even heat distribution and can be reused for baking projects where you don't mind a slight caramelization flavor.
Regardless of your choice, the key is *quantity*. You need far more than you might initially think. When lining your pie shell with parchment paper, be sure to fill it **to the very top**, even piling the weights slightly above the rim of the dough. For a standard 9-inch pie plate, you might need anywhere from 2 cups (for sugar/small beans) up to 3.5 pounds (for rice/larger beans). The goal is to fill every nook and cranny, creating a firm, even barrier that holds the dough firmly in place. Using a crumpled piece of parchment paper under your weights will also make for easier removal and ensures the weights don't stick to your delicate crust. For a deeper dive into the mechanics of achieving crisp results, our article
How to Blind Bake Pie Crust for Flaky, Crisp Results offers further guidance.
Step-by-Step Guide: Foolproof Parbaking in Action
With your dough chilled and your weights at the ready, you're prepared to execute the perfect parbake. Follow these steps for a consistently crisp and beautifully structured crust:
- Prepare Your Pie Dough: Remove your chilled round of pie dough from the fridge. On a lightly floured surface, roll it out evenly into roughly a 15-inch round, about 1/8 to 1/4 inch thick. Avoid overworking the dough, which can activate gluten and lead to toughness.
- Transfer to Pie Plate: Gently fold the rolled dough in half, then in half again, and carefully transfer it to your 9-inch pie plate. Unfold the dough and gently press it into the contours of the plate without stretching it.
- Trim and Crimp: Trim the overhanging dough, leaving about a 1/2-inch border extending beyond the edge of the pie plate. Tuck this excess dough under itself to create a sturdy edge. Then, crimp or flute the edges as desired. This aesthetic detail also helps reinforce the crust's structure.
- Second Chill (Crucial!): Once the dough is fitted and crimped, place the pie plate back in the refrigerator for at least 30 minutes, or even up to an hour. This second chill is vital for helping the crust hold its shape and preventing shrinkage during baking.
- Preheat Oven & Prepare for Baking: Preheat your oven to a high temperature, typically 400-425°F (200-220°C). Place a baking sheet in the oven while it preheats; baking the pie crust on a hot baking sheet helps conduct heat directly to the bottom of the crust, ensuring it cooks evenly from below.
- Line with Parchment & Fill with Weights: Remove the chilled pie crust from the fridge. Gently line the inside of the dough with a piece of parchment paper, pressing it snugly into the sides and bottom. Pour your chosen pie weights (dried beans, rice, or ceramic weights) into the parchment-lined shell, filling it completely to the brim and even mounding slightly above the rim.
- Initial Weighted Bake: Carefully transfer the weighted pie crust onto the preheated baking sheet in the oven. Bake for 15-20 minutes. The high heat, combined with the weights, will set the crust's structure and begin the cooking process.
- Remove Weights & Continue Baking: Carefully remove the pie plate from the oven. Using the parchment paper, lift and remove the pie weights. Return the pie crust to the oven, reducing the temperature slightly if recommended by your recipe (often to 375-400°F / 190-200°C), and continue baking for another 10-15 minutes, or until the bottom and sides are golden brown and appear dry. If the edges are browning too quickly, you can use a pie shield or small strips of aluminum foil to protect them.
- Cool Completely: Once baked, remove the crust from the oven and let it cool completely on a wire rack before filling.
Beyond the Basics: Tips for Perfection
Even with the right method, a few extra considerations can elevate your parbaking results:
- Don't Overwork the Dough: This is a cardinal rule for pie crust. Handle the dough as little as possible to prevent gluten development, which leads to a tough crust.
- Use Cold Ingredients: Always start with very cold butter and ice water. This preserves the integrity of the fat, essential for flakiness.
- Monitor Your Oven: Ovens can have hot spots. Rotate your pie crust halfway through baking to ensure even browning.
- Parbaked vs. Fully Blind-Baked: Understand the distinction. A "parbaked" crust is partially cooked for pies that will undergo further baking with their filling. A "fully blind-baked" crust is cooked until golden and crisp all the way through, intended for no-bake fillings. Adjust your unweighted baking time accordingly.
- Storing Parbaked Crusts: A fully blind-baked crust can be stored at room temperature for a day or two, or wrapped tightly and frozen for up to a month. This can be a fantastic time-saver for holiday baking!
Conclusion
Embracing the art of parbaking is a game-changer for any pie enthusiast. By paying close attention to the details—especially the critical role of chilling your dough and the sufficient use of pie weights—you can confidently create perfectly shaped, wonderfully crisp, and deliciously flaky pie crusts every single time. Say goodbye to soggy bottoms and shrunken edges, and welcome a new era of foolproof, delectable pies into your kitchen. Your future pies (and your grateful guests) will thank you.